
How to Create a Full Backup of Your WordPress Site

Always having a full backup of your WordPress website is the best preventative measure you can take against anything that may go wrong with your website such as hacks, breaks, or user error. Whether you’re new to WordPress or you’ve already been using WordPress for your website, it’s important to know why you need regular backups, what backups are, and how to successfully restore a site using a backup. All of this will help you get your site back up and running as quickly as possible in the event that your site is down or not functional.
Why You Should Always Keep a Full Backup of Your Site
If you have limited knowledge of PHP and you’re editing your WordPress core files or poking around in your database, the chances of you breaking your website is very high. In fact, you might have already experienced the dreaded white screen of death or were not able to log in to your WordPress admin. It’s in cases like this where backups come in handy.
But it’s not just cases of user error where backups might be needed. There may be times when you log in to your admin to update a plugin as usual and the next thing you know, your site has been broken.
Or worse, your website gets hacked and you don’t even know what to do.
These are all common problems that WordPress users face, and quite frankly, not just WordPress users, but just about anyone who has a website.
What is a WordPress Backup
Your WordPress website consists of elements such as:
- WordPress Core
- Themes
- Plugins
- Media Assets such as Images
- User-Submitted Comments
- Pages
- Posts
These are all stored in either your Files or Database.
In the simplest explanation, your Files will be your WordPress core installation, themes, and plugins; the things that aren’t dynamic. Your Files can be accessed when you make a connection to your server through an FTP client where you see folders like wp-content. These are your Files.
Your Database is where all the dynamic content gets stored, such as your images, comments, user logins, posts, etc. Your Database, unlike your Files, can not be accessed via FTP. If you make a connection to your server via FTP and poke around, you will be able to find your theme files and plugin files, but you won’t be able to find any of your comments. That’s because your comments are considered dynamic and they are stored in the database, which can only be accessed through your cPanel or whichever web panel is used by your host.
Therefore, it’s important to make sure both your Files and Database are backed up.
Many hosting companies will tell you that they provide automatic backups as a selling point but unfortunately, most don’t backup both your Files and your Database. So if you’re relying on your host to retain your backups, make sure you understand what they’re actually backing up.
And speaking of hosts, although many may tell you that they regularly do a full backup of your site’s Files and Database, you’ll want to make sure those backups are readily accessible to you.
Backups aren’t useful if you can’t access them quickly enough to restore your site in a timely manner.
With some hosting companies, if you want to request a backup or restore your site from a backup, you have to go through a time consuming process of contacting their support and having someone from their support staff do it for you.
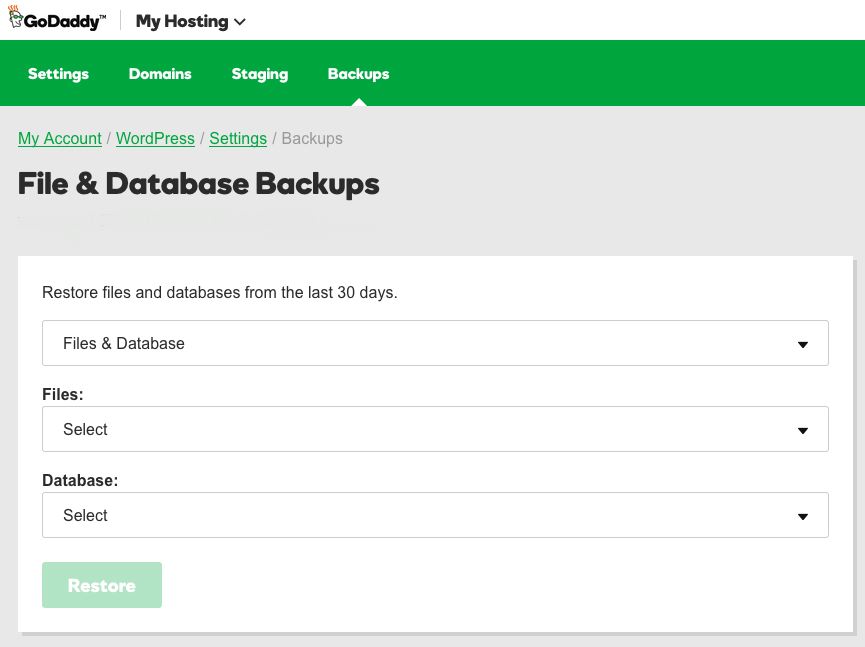
In contrast, other hosts will have backups readily available for your to access in your online account, where you can select a backup from a date and restore your site with one click. Flywheel, GoDaddy, and WPEngine are some companies that have this feature and it’s exactly what you should be looking for.
The questions you want to ask your hosting company are:
- How often do you backup both the Files and Database?
- How can I access them through my account?
- Am I able to download the backups onto my local drive?
- How quickly can I restore my site from a backup?
Whether your hosting company provides sufficient WordPress backups or not, it is also recommended that you have a second source of backups. You can create backups of your WordPress site either manually or through a plugin.
How to Manually Create a Full Backup
Because your Files and Database are accessed differently and thus found in two different locations, you’ll actually be backing up these two individually to create a full backup of your site. Here’s how to back up each one:
Backup WordPress Files
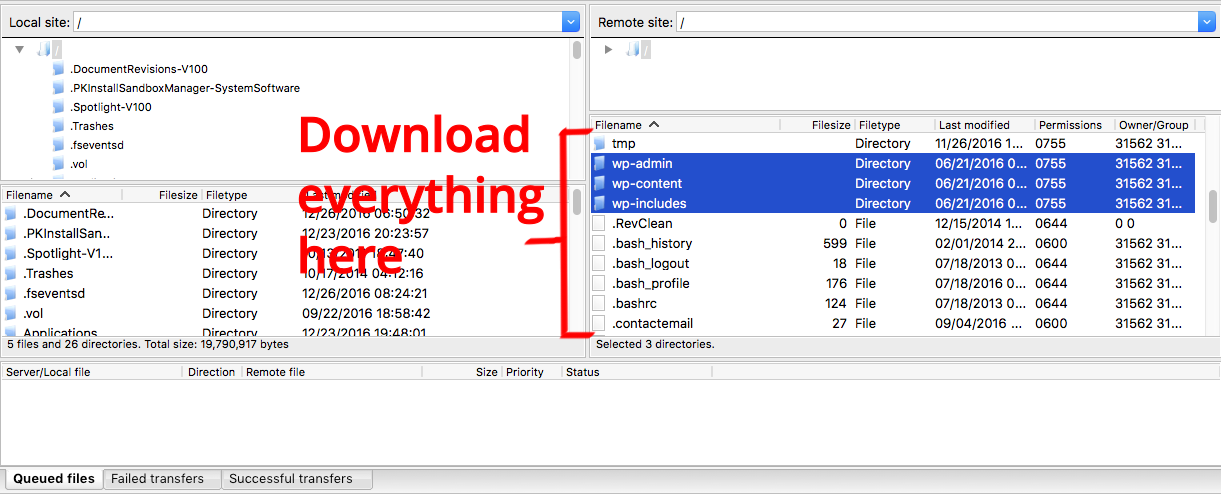
Backing up your WordPress files is easy. All you have to do is access your site’s files through an FTP client like FileZilla, Cyberduck, or CrossFTP and download your site’s files onto your computer’s local drive.
To know which files you need to download, you should first find the level where your wp-admin, wp-content, and wp-includes folders are located and then download all the folders and files you see there.
Backup WordPress Database
Backing up your WordPress database is a little bit more complicated, as you’ll first have to access phpMyAdmin or whichever database panel your host provides. In addition, the way you access phpMyAdmin will depend on which web panel your hosting provider uses.
You can find more information on how to access your database or phpMyAdmin through this article according to the web panel you use. But for the rest of this article, we will use phpMyAdmin since it is the most popular database panel in the WordPress community. If you use anything else, let us know in the comments below and we’ll help out.
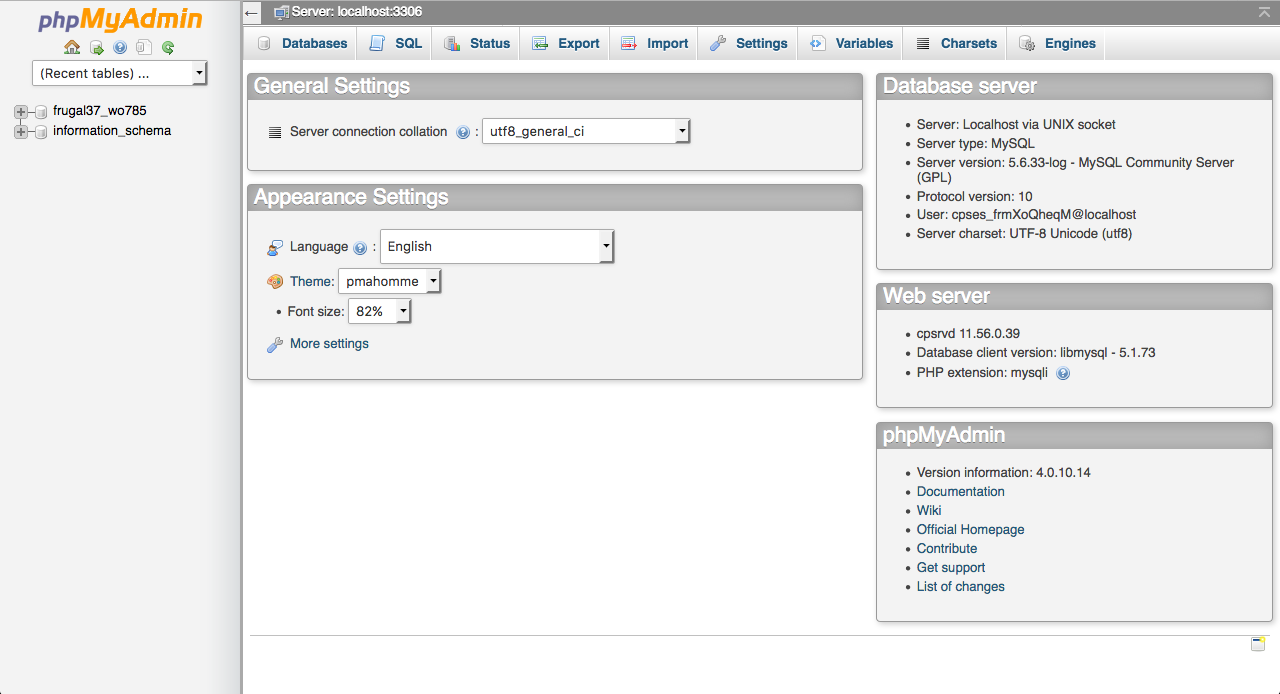
Once you access phpMyAdmin, you should see something like this:
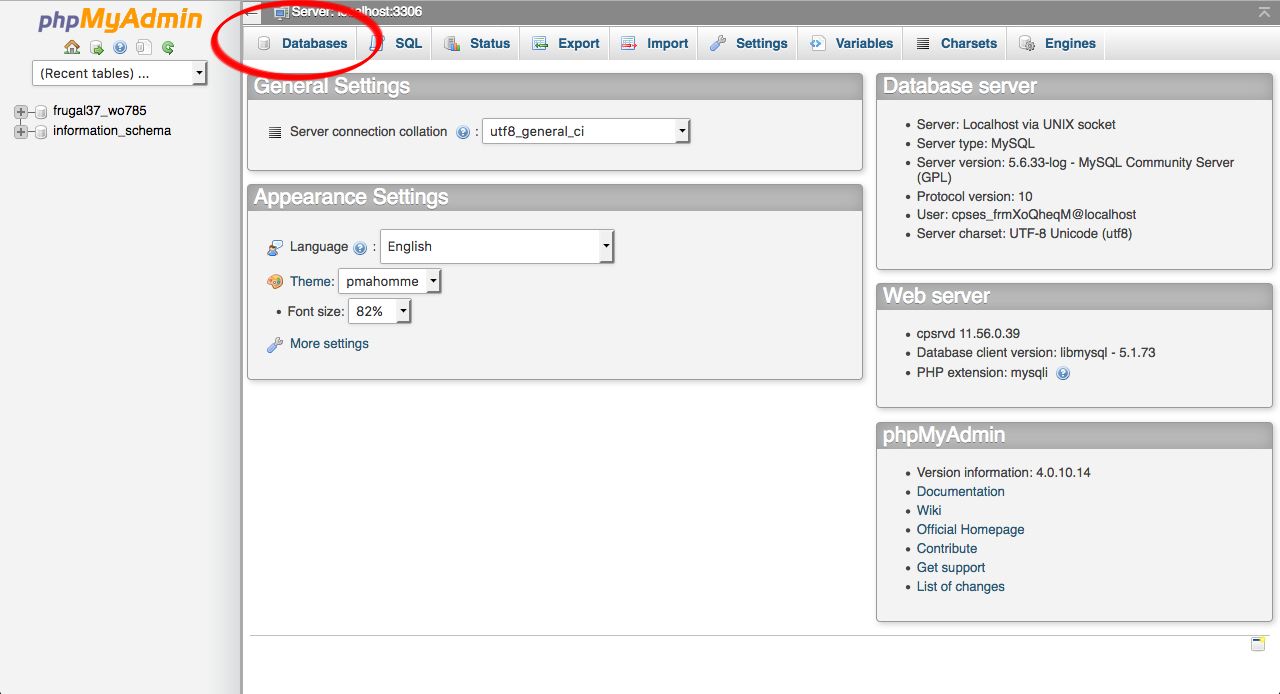
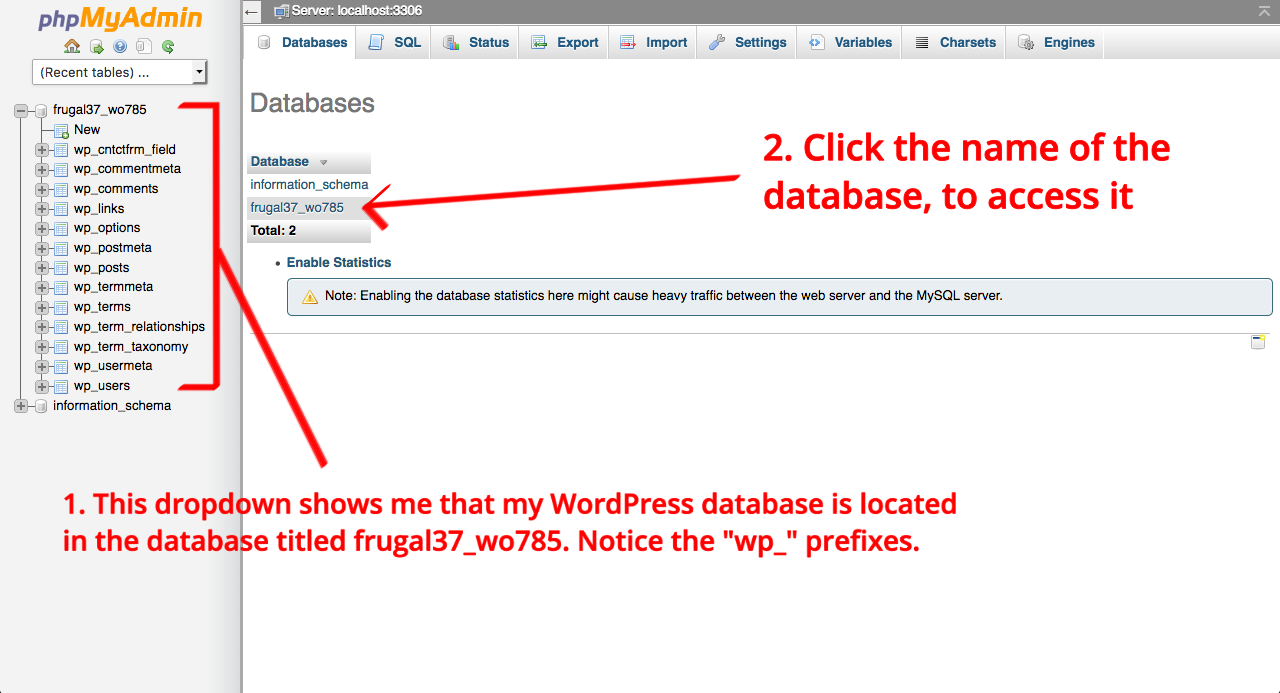
1. In your phpMyAdmin dashboard, click on Databases.
2. On the next page, you will have to select the database where your WordPress data is stored.
However, most people will find that they have more than one database. In order to find the one that holds your WordPress data, click the expand icons next to the listed databases in the left sidebar.
The one that has a list of names that begin in wp_ is the one that holds your WordPress data.
Once you identify the correct database, click on the name of the database in the center of your screen.
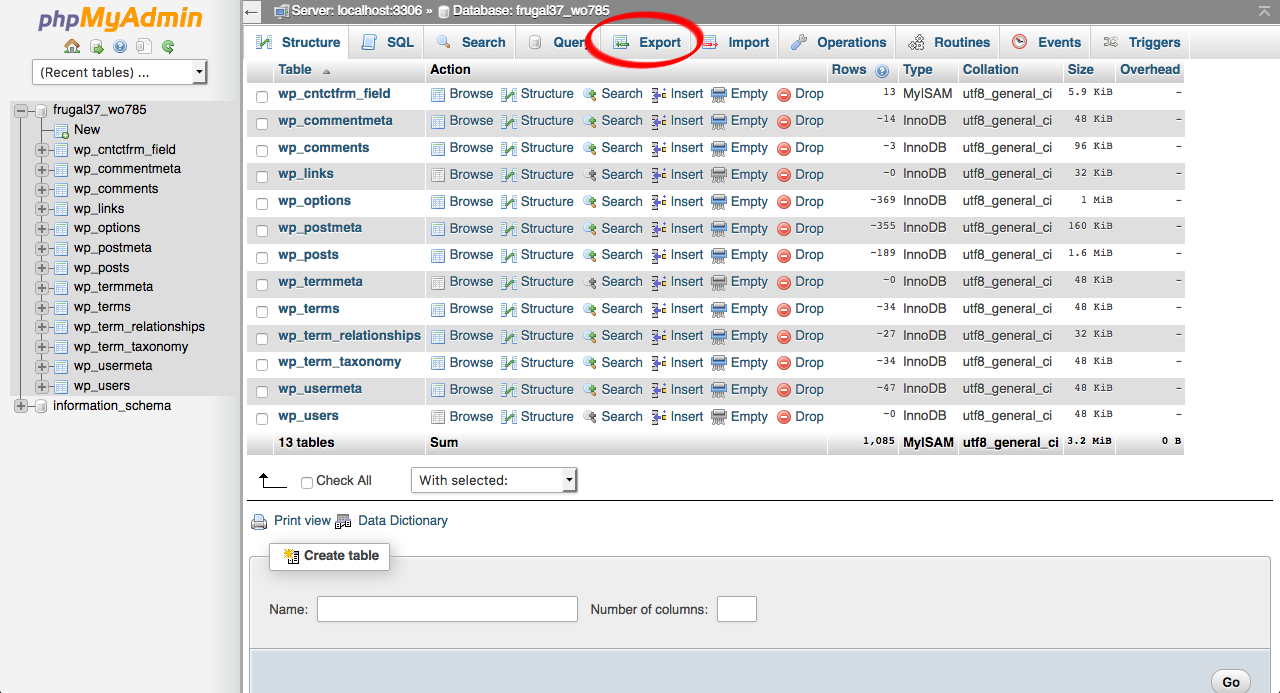
3. On the following page, click the Export button on the top menu bar.
4. In this last page and before you finally download your database, you’ll see numerous options that may appear foreign to you. Follow the rest of the step-by-step instructions in this article to select the appropriate options.
However, keep in mind that these instructions won’t cover every single option you see on your screen/page. Only the options that are pertinent to every user will be covered.
You may also see some options (that are not covered) selected on our screenshots, but not selected by default on your screen. That’s because most of the settings you see on this page will be preselected or deselected based on your hosting configuration and you should generally trust the setup you see.
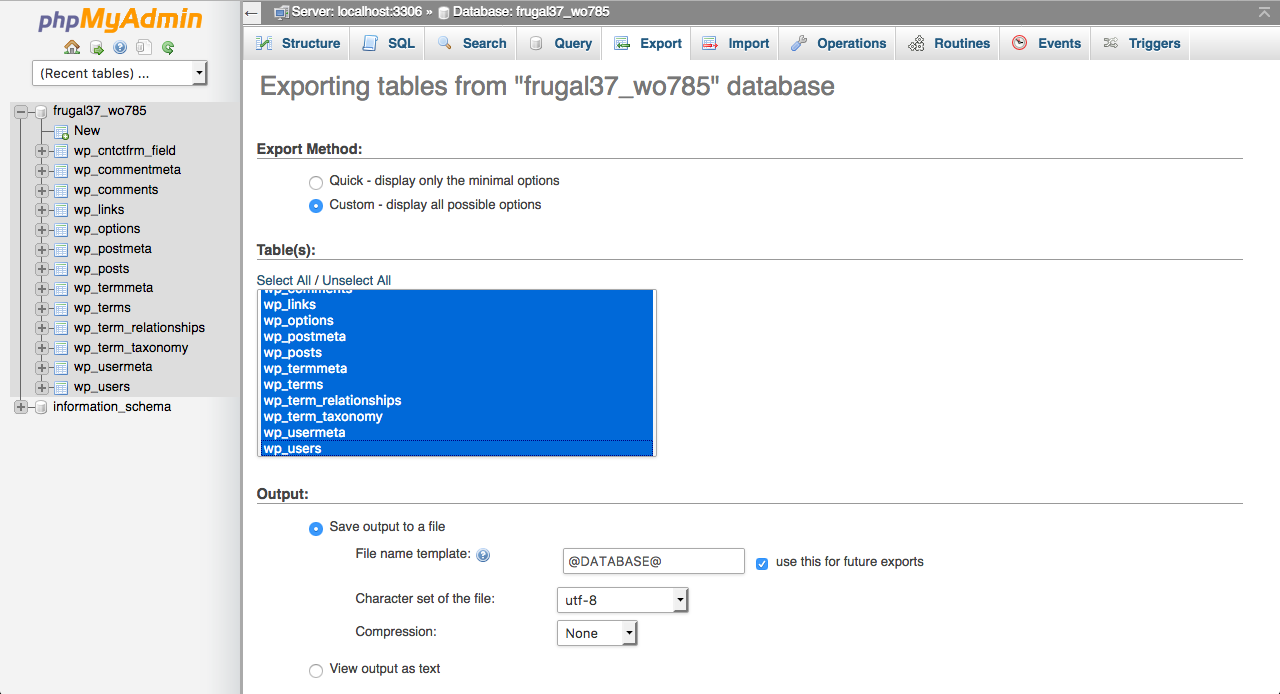
The first section is titled Export Method and you should select the Custom option.
The second section is titled Table(s) and you should highlight/select every single line.
The third section is titled Format and the SQL option should be selected.
The fourth section is titled Format-specific options. You should leave what you see here.
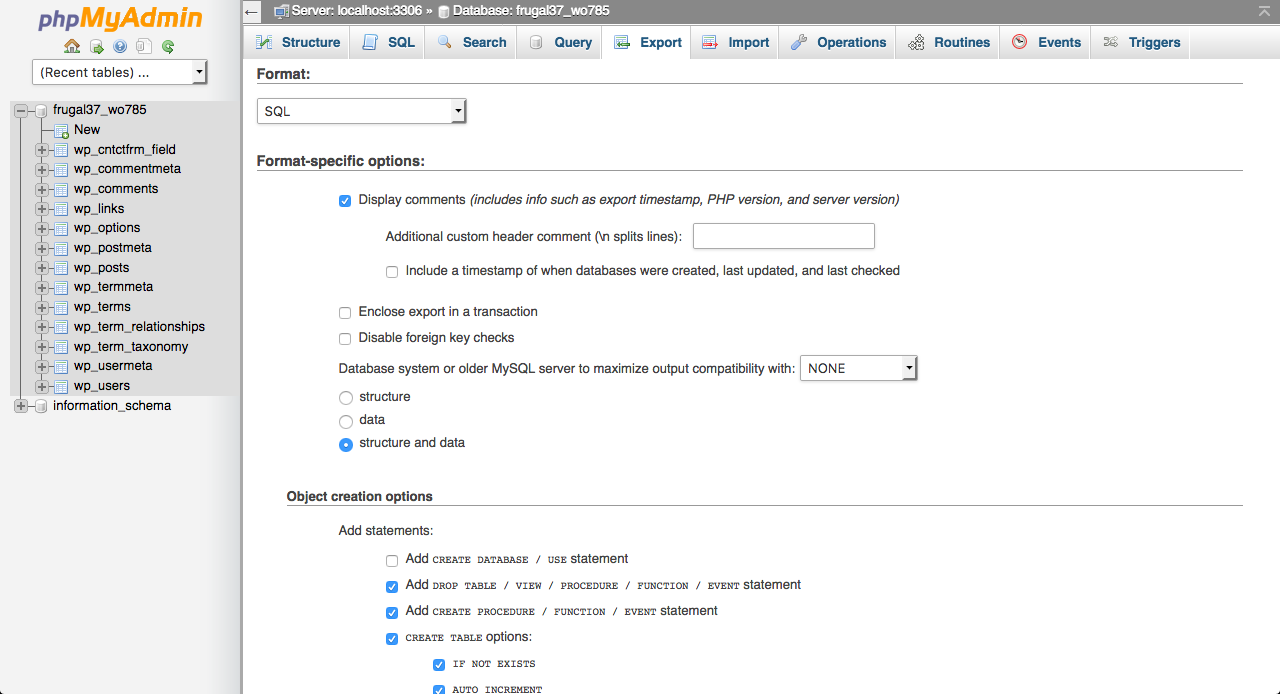
The fifth section is titled Object creation options. How this section appears may depend on your phpMyAdmin but the first thing to do is to check the box that includes Add DROP TABLE. Then make sure the IF NOT EXISTS option is selected as well.
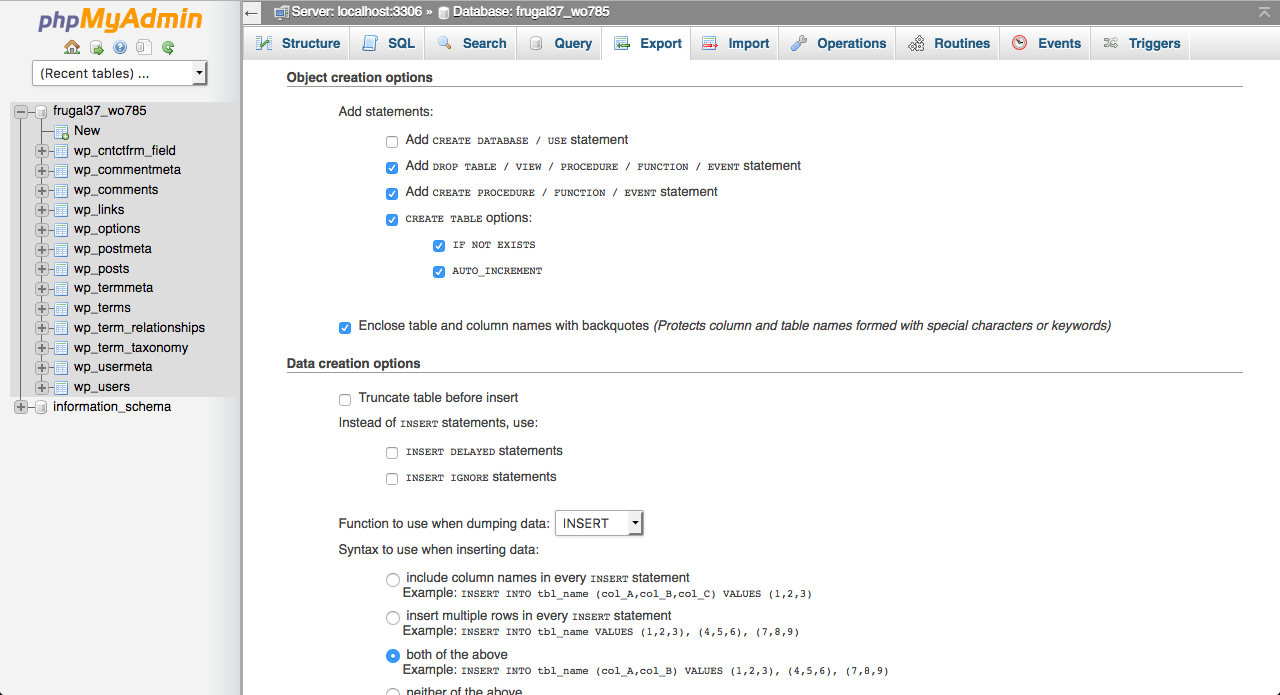
The sixth section is titled Data creation options. You should leave what you see here.
5. Click the Go button. Your database will begin to download to your computer’s local drive.
How to Restore a Site from a Manual Backup
Just as backing up your Files and Database involves two separate processes, so does restoring your site from a manually created backup. You’ll have to restore your Files and then restore your Database.
Restore WordPress Files
Assuming you have a backup of your files on your computer’s local drive, you’ll have to overwrite your current files or import this backup onto your site through an FTP client.
1. In the same way that you backed up your files, access your site via FTP.
2. Find the directory level where your wp-admin, wp-content, and wp-includes folders are located and select all of the folders and files.
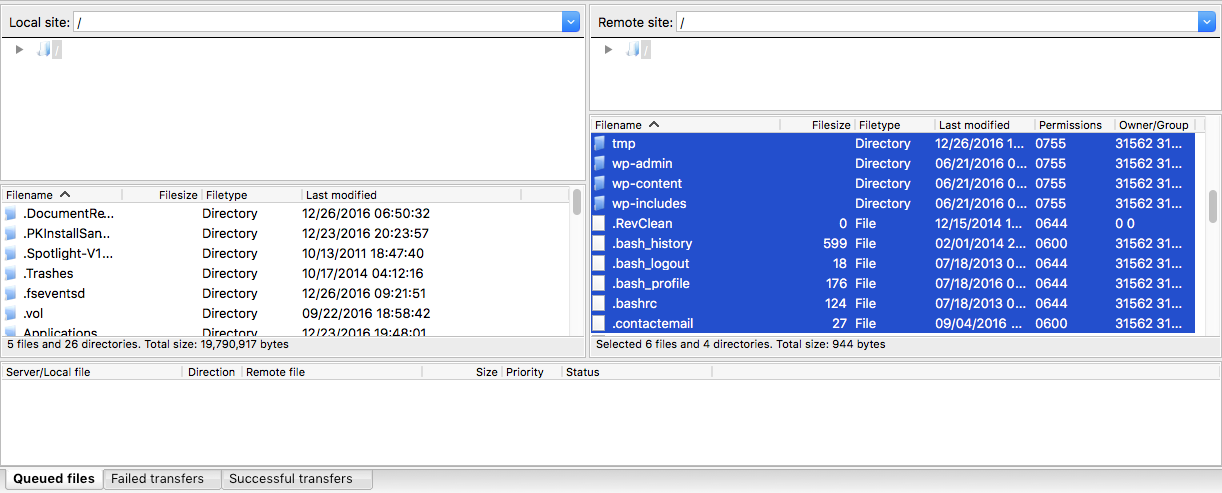
3. Then on the local drive side of your FTP client, select the all the folders and files in your backup to overwrite what’s selected and upload them.
Restore WordPress Database
Restoring your WordPress Database from a backup is a lot easier than creating the backup itself. In order to begin the process, first access your database tables as shown in Step 3 of the database backup process above.
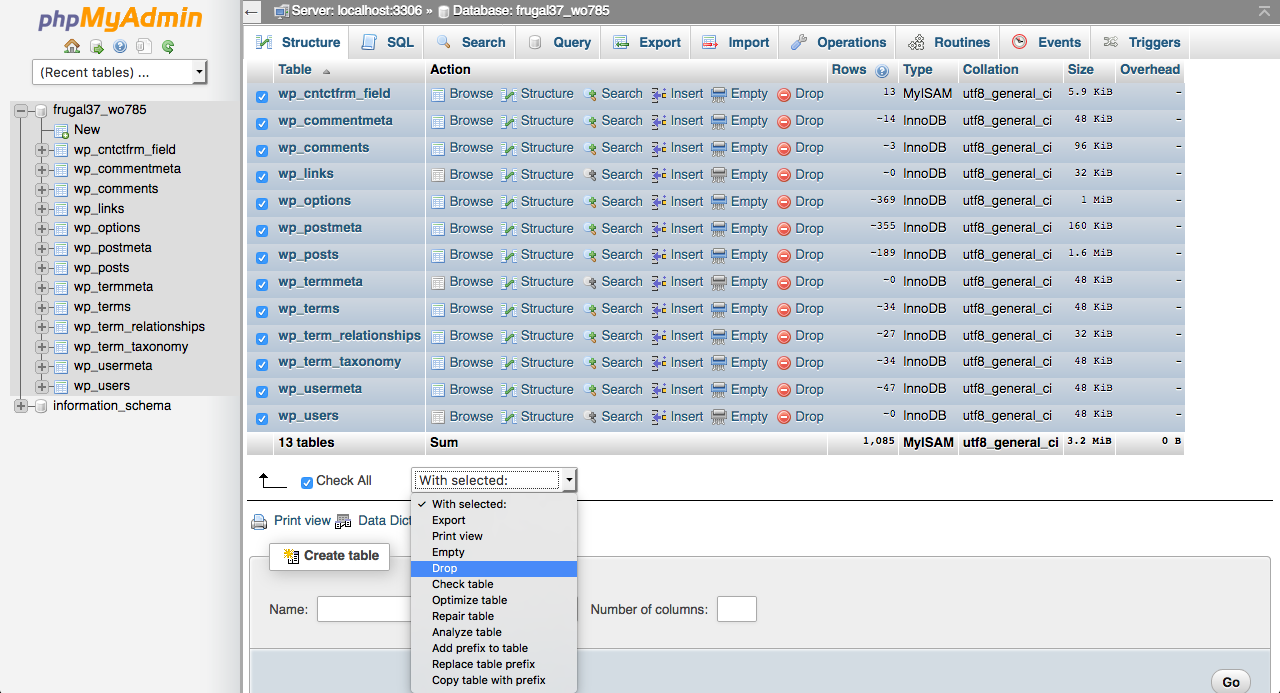
1. Before you restore the database from a backup, you’ll have to erase the existing database. To do so, click the Check All option to select all the tables. Then with the dropdown menu titled With selected, select the Drop option to erase everything.
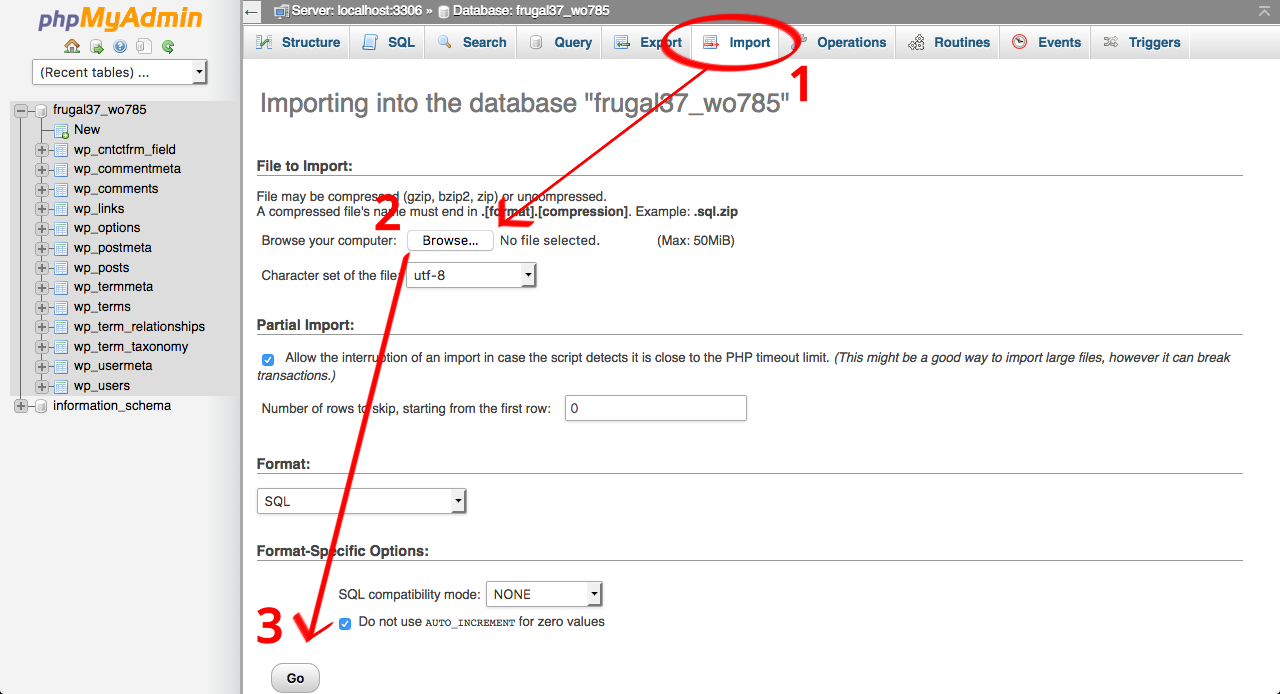
2. Click the Import option in the top menu bar.
3. Click Browse to select the database backup on your local drive.
4. Then click the Go button to begin the import process.
Using a Plugin to Create a Full Backup
Backing up and restoring a WordPress site manually is very resource intensive. Fortunately, there are plugins that you can use to automate the whole process. Best of all, our favorite plugin, UpdraftPlus is free.
1. To use UpdraftPlus to automate your WordPress backup activities, first download the plugin and activate it.
2. Navigate to the UpdraftPlus settings by going to Settings in your WordPress admin and then clicking on UpdraftPlus Backups.
3. Click on the Settings tab.
4. The first two options, Files backup schedule and Database backup schedule, will allow you to set how you would like your Files and Database to be backed up and how often.
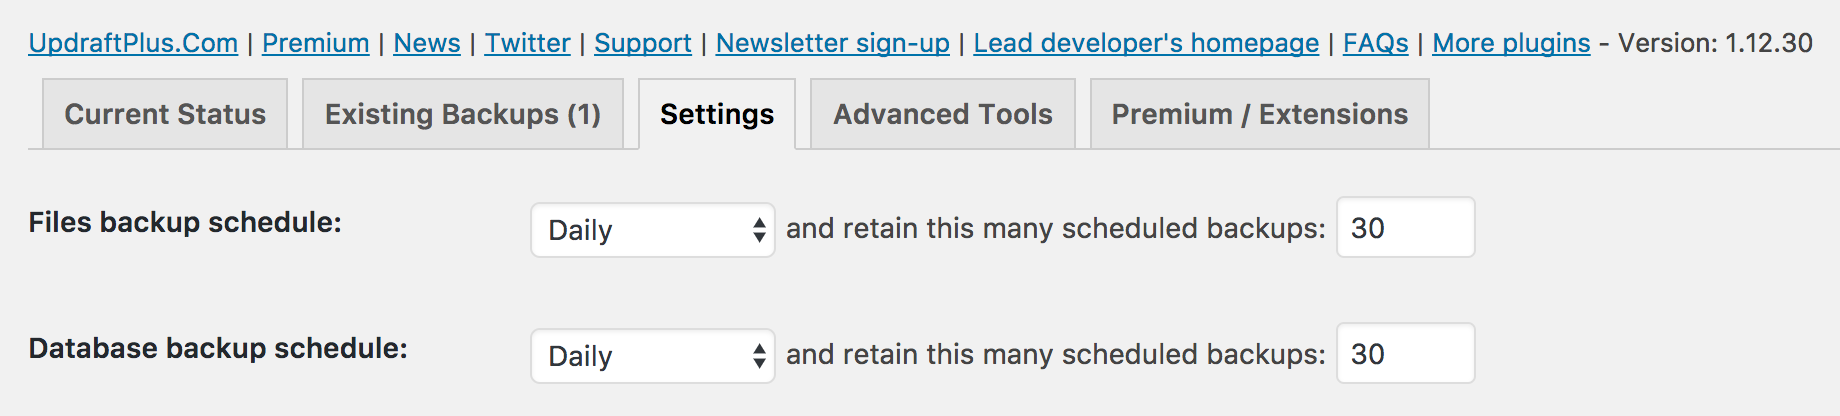
We have set our website, Zen WP, to be backed up every day automatically and keep 30 copies of our files and database at any given point.
5. The next option underneath is titled Choose your remote storage (tap on an icon to select or unselect):. Here, you can select where your backups will be uploaded once they are created. Whether you choose to store your backups in a remote server or not, a copy of your backups will also be available on your server.
However, you should not rely on backups stored on your server and should always choose a remote storage option in addition to the local option.
Whichever option for remote storage you choose, you will have to follow the instructions to complete the setup process.
6. Once you’ve set your backup method and intervals and have chosen your remote storage location, scroll down to the very bottom and click the Save Changes button.
At this point, your backups will be automatically generated and stored in a remote server in regular intervals. Whenever you need to access them or restore your site using one of your backups, you can access them through the UpdraftPlus settings or directly through your remote storage.
Using Your Web Panel for Backups
Depending on the your web panel, you also have the option to create backups of your entire site in one process. However, this is rarely recommended.
We recommend that you use a reliable plugin to automate the entire backup process. Not only does this guard against user error but also saves you a ton of time.
Only in rare exceptions would one need to create manual backups. Most of the time, it would be because a site is too large or if the custom settings available directly through phpMyAdmin need to be utilized.
In neither cases is using a web panel to create or restore a backup the better option so it doesn’t make sense to use it. However, if for any reason you choose to use this method and your web panel is cPanel, you can follow the guide in our How to Backup WordPress using cPanel article.
10 Best WordPress Backup Plugins to Automate Your Backups


