How to Add Google Analytics to WordPress
Last Updated on May 13, 2018 – How to Add Google Analytics to WordPress
Google Analytics is an amazing tool for tracking the activity of your visitors and gaining insights on what’s working for your site and how your visitors or customers are interacting with your content.
When you sign up for a Google Analytics account, you’ll be given a unique snippet of code that you must insert on every page of your website. That sounds like a very time consuming or error-prone task. But fortunately with WordPress, it’s relatively simple and straightforward.
In fact, most premium themes will have a setting in Theme Options that allow you to paste the Google Analytics tracking code and the theme will automatically take care of implementing it on every page for you.
However, if you don’t have a premium theme or your theme doesn’t have an option to insert the Google Analytics snippet, follow these steps:
First, Create a Google Analytics Account
1. Sign up for a Google Analytics account on Google.com to get a unique tracking code for your website.
2. Go to the Google Analytics site at https://www.google.com/analytics/.
3. Follow the steps to set up your Analytics account.
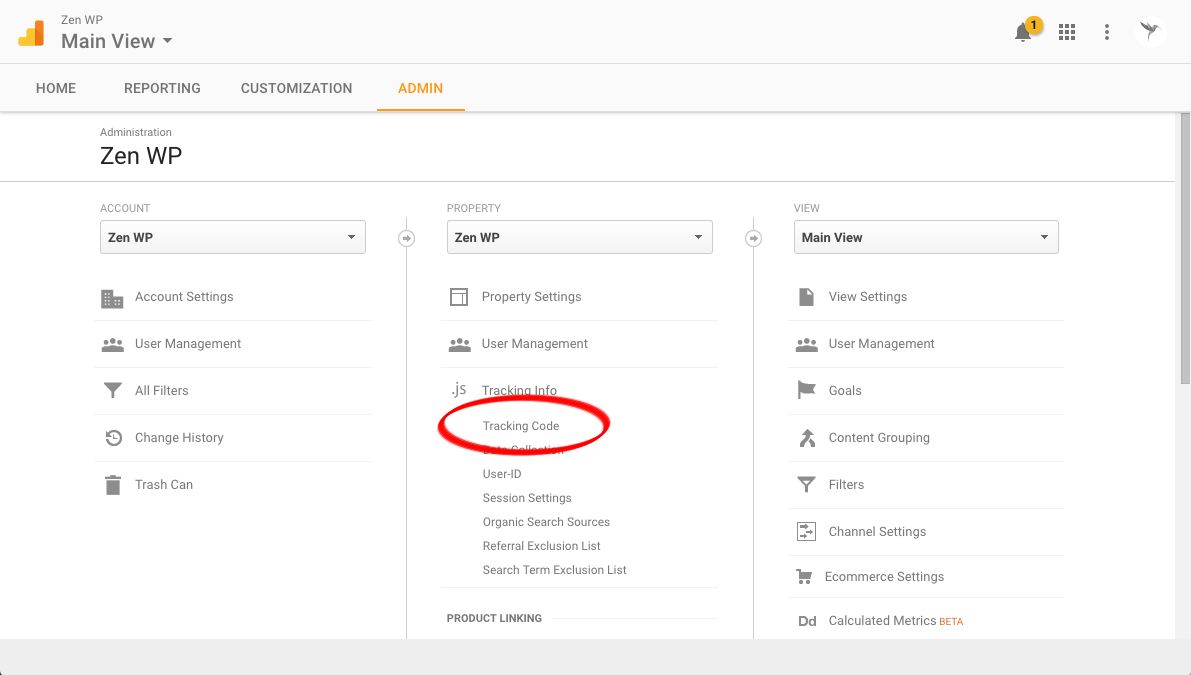
4. Once your Google Analytics account is set up, navigate to your Admin. Then find the option to view your Tracking Code.
5. Identify the snippet of code that must be inserted onto every page. This will include everything in the circled box below, including the <script> tags.
You now have four possible ways to add the Google Analytics code to your WordPress website:
- Through your Theme Options
- Through your functions.php file
- Through a plugin
- Through a custom plugin
At this point it’s also good to mention that the code needs to be added between the <head> and </head> tags so that the moment the first part of your page loads, the code will fire and begin to track the user.
You’ll oftentimes hear some people tell you to add it at the end of the page between the <footer> and </footer> tags so the code doesn’t run until your page has fully loaded in order to avoid picking up bounced visitors. This is bad advice.
Because if you wanted to only analyze visitors who haven’t bounced from your landing page, there is a setting in your Google Analytics account that allows you to segment your audience to achieve that.
So if you can filter out the bounced visitors in Google Analytics anyway, why would you want to track them? Because through Google Analytics, you can also gain some valuable information that might help you determine why visitors are bouncing from your website. But if you don’t track them in the first place, you won’t have access to any of that information.
In fact, this is one of the reasons why Google Analytics is so useful; so you can see where your advertising is being wasted. After all, if you’re paying for people to visit your website, don’t you want to minimize the instances of them leaving immediately and never coming back?
Now, here are step-by-step instructions on how to add your Google Analytics code to your website by all four methods.
Option 1 – Add the Code Through Your Theme Options
Your theme, especially if it’s a premium theme, will most likely have a section in your Theme Options (or named something similar) where you can simply copy and paste the Google Analytics code.
Check to see if your theme has this feature first before considering other options, as this is the most reliable and easiest way to add the code to your website.
Option 2 – Add the Code Through functions.php
1. Download and open your functions.php file via FTP OR log in to your WordPress admin, navigate to Appearances > Editor > functions.php.
2. Add this snippet of code to at the end of the file:
<?php
add_action(‘wp_head’, ‘add_googleanalytics’);
function add_googleanalytics()
{
?>
// Paste your Google Analytics code over this line
<?php
}
?>
3. Delete everything on line 6, copy your entire Google Analytics code, and paste it on that line.
4. The finished product should look something like this:
<?php
	add_action(‘wp_head’, ‘add_googleanalytics’);
	function add_googleanalytics() {
?>

		<!-- Global site tag (gtag.js) - Google Analytics -->
		<script async src="https://www.googletagmanager.com/gtag/js?id=UA-XXXXXXX-X"></script>
		<script>
  			window.dataLayer = window.dataLayer || [];
  			function gtag(){dataLayer.push(arguments);}
  			gtag('js', new Date());
  			gtag('config', 'UA-XXXXXXX-X');
		</script>

<?php
	}
?>
5. Upload the updated functions.php file via FTP.
Note: Notice the “wp_head” in Line 2 of both examples above, which instruct WordPress to add the Google Analytics code in the header between the <head></head> tags. However, if you want to add it to the footer, simply change this to “wp_footer”, where your code should look like this:
<?php
	add_action(‘wp_footer’, ‘add_googleanalytics’);
	function add_googleanalytics() {
?>

		<!-- Global site tag (gtag.js) - Google Analytics -->
		<script async src="https://www.googletagmanager.com/gtag/js?id=UA-XXXXXXX-X"></script>
		<script>
  			window.dataLayer = window.dataLayer || [];
  			function gtag(){dataLayer.push(arguments);}
  			gtag('js', new Date());
  			gtag('config', 'UA-XXXXXXX-X');
		</script>

<?php
	}
?>
Option 3 – Add the Code Through a Plugin
1. Download and activate the Insert Headers and Footers plugin.
2. Navigate to Settings > Insert Headers and Footers to find the option to add to your header.
3. Copy and Paste your entire Google Analytics code in the header box.
Using the Insert Headers and Footers plugin is the easiest and most straightforward way to add the code to every page. It’s a very simple and easy-to-use plugin.
But if you are willing to pay for the best Google Analytics plugin for WordPress, nobody will argue that MonsterInsights, which is packed with features and a very easy-to-use platform, is the best available option.
Most use MonsterInsights because they find the reports and data on their Google Analytics account difficult to read and decipher. MonsterInsights pulls your Google Analytics data and shows you your website’s data through their own reports, which many find much easier to read.
But the real value in MonsterInsights is how the plugin allows you exclude admin sessions from being tracked by Google Analytics. If you are active on your website as an admin, you would not want your activity to be reflected in your reports, as it will muddy the data about your true audience.
Of course, there is a way to prevent admin activity from being tracked through your Google Analytics account but it requires a bit of technical knowledge and some changes to the way in which you access your website. MonsterInsights allows you to skip all of this and control every aspect of your Google Analytics account through the WordPress plugin.
Option 4 – Add the Code Through a Custom Plugin
Before you freak out, it is actually very easy to create your own WordPress plugin, especially with something as basic as adding a snippet of code to every page.
1. First, create php file and name it whatever you want, for example: zenwp-google-analytics.php.
2. Then, through your favorite text editor, copy and paste this snippet of code in that file:
<?php

/*
Plugin Name: Google Analytics Plugin
Plugin URI: https://zenwp.co
Description: Adds the Google Analytics code to the header of your theme.
Author: Zen WP
Version: 1.0.0
*/

function zenwp_google_analytics() { ?>

<?php }
add_action( 'wp_head', 'zenwp_google_analytics', 10 );
3. Lines 4 through 8 contain all the information about your plugin that will be displayed on your Plugins page. Make sure you replace all the information with your own.
4. Line 12 is where you’ll be pasting your Google Analytics code. It should look something like this after you’re done:
<?php

/*
Plugin Name: Google Analytics Plugin
Plugin URI: https://zenwp.co/
Description: Adds the Google Analytics code to the header of your theme.
Author: Zen WP
Version: 1.0.0
*/

function zenwp_google_analytics() { ?>
		<!-- Global site tag (gtag.js) - Google Analytics -->
		<script async src="https://www.googletagmanager.com/gtag/js?id=UA-XXXXXXX-X"></script>
		<script>
  			window.dataLayer = window.dataLayer || [];
  			function gtag(){dataLayer.push(arguments);}
  			gtag('js', new Date());

  			gtag('config', 'UA-XXXXXXX-X');
		</script>
<?php }
add_action( 'wp_head', 'zenwp_google_analytics', 10 );
5. Activate the plugin in your WordPress admin on the Plugins page.
Verify That Your Code is Working Properly
1. Download and open the Google Chrome browser.
2. Download Google’s Tag Assistant in the Chrome Web Store.
3. Follow the instructions to activate the app on your Chrome browser.
4. Restart the browser and enter the URL for any page on your website.
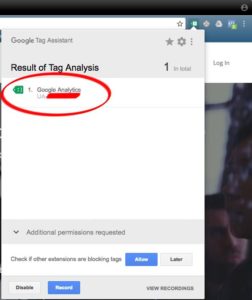
5. You should see the Tag Assistant icon on the top right-hand corner of your browser’s window.
6. Click on it to view the information. You’ll know that your code is working if the tag is green and you see confirmation that your Google Analytics code is being detected.
How to Add the Facebook Pixel in WordPress


