
How to Create a WordPress Child Theme

Having a child theme is necessary for every WordPress site and installing one is the first thing a WordPress user should do upon creating a new website.
Why? Because at some point in the future, you’ll find the need to directly edit your theme files. And if you don’t have a child theme, all the changes you make to your theme files will be lost every time you update your theme, requiring you to implement the same changes over and over again.
It’s just much better for organization, and it’ll reduce the chances of user error as you’ll have to edit your theme files less frequently.
So How Does a Child Theme Work?
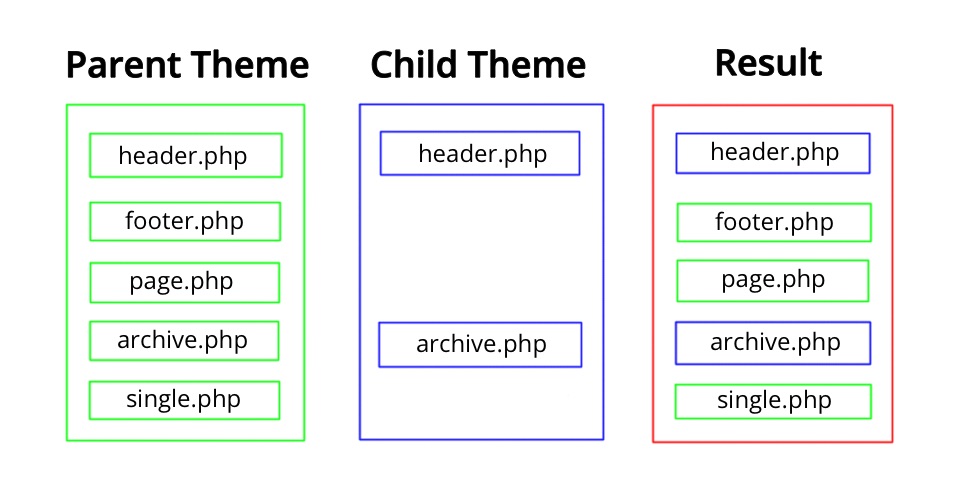
A child theme is essentially a theme of it’s own but in order for a child theme to work, it must have a parent theme. The parent theme is the theme that’s currently active on your WordPress website, the one you downloaded from the WordPress repository or Themeforest like Twenty Sixteen.
And to use a child theme, you must install it and activate it in place of your parent theme.
If you have a “blank” child theme, you won’t see any changes on your website once you install and activate it. Because what a child theme does is that it draws everything from its parent theme (functionality, features, etc.).
However, if you upload, for example, a footer.php file onto your child theme, the footer.php file in your child theme will be executed, not the one in your parent theme folder.
So in other words, when you have a child theme, WordPress will check your child theme first to see if a particular file exists. If it doesn’t, it will use the file from its parent theme.
With a child theme, you can easily make changes to your core files by creating and uploading onto your child theme folder edited versions of a file from your parent theme folder, and not worry about your changes being overwritten through theme updates.
It also allows you to keep your parent theme up to date and not worry about all the other problems that come with outdated theme files.
How to Create a Child Theme
1. Create a theme directory in your WordPress installation.
Create a folder called themename-child and upload it onto your theme directory via FTP, while replacing “themename” with the name of your parent theme. So if your parent theme’s name is twentyseventeen, it should be twentyseventeen-child.
2. Create a stylesheet for your child theme’s folder.
Create a plain text file called style.css and copy and paste this:
Here’s what all of those lines mean:
- Theme name – This is the name that will show up for your child theme in your admin area’s theme selector.
- Description – This is what will show up when you click on “Theme Details.”
- Author – This is you!
- Template – This is the most important element. What you put here must match the name of your parent theme and it’s also case sensitive.
- Version – This will display the version of your child theme and is really for just organizational purposes.
3. Upload the style.css file onto your child theme folder via FTP.
4. In your WordPress admin, activate your child theme.
5. Enqueue the parent file’s stylesheet.
At this point, if you take a look at your website, everything will function fine. However, you probably have noticed that it doesn’t look like it should. It just looks like a plain text website.
That’s because none of the styling information from the parent theme is present in the child theme.
Remember when I said that WordPress will look for a file, in this case the style.css, in the child theme folder first and if it can’t find it, it’ll execute the parent theme’s style.css file? In this case, both the parent theme and the child theme have the stylesheet.
Therefore, WordPress executed the child theme’s stylesheet and not the parent theme’s. So what we have to do now is to get WordPress to load both. This can be done by enqueueing the parent file’s stylesheet.
To do this, create another plain text file called functions.php and paste this:
6. Upload the functions.php file onto your child theme folder via FTP.
Now you have a completed child theme that’s active on your site!
You’ll have noticed that your website now looks exactly the same as it did before. That’s because you have what I referred to earlier as a “blank” child theme.
Now if you decide that you don’t like the styling of your theme’s footer, you can create a new footer.php file with functionality or styling that you like and upload it onto your child theme’s folder.
Once you do that, WordPress will execute the footer.php file in your child theme and completely ignore the one in your parent theme.
Child Theme Tips
- You can not delete the parent theme from your WordPress installation. Otherwise, the child theme won’t have a parent theme from which it could draw the features.
- If you purchased a premium theme, most theme authors will provide a child theme already, which you can simply download and install. See your theme’s documentation for specifics.
- If you’ve already been using WordPress without a child theme, you’ve probably made a number of changes in your Theme Options page. Most of the time, upon implementation of a child theme, these changes will be overwritten. Make sure you’re prepared for this or consult an experienced developer.
functions.php
Remember how I said that child themes work on a file-level, where WordPress will not execute a file in a parent theme’s folder if that same file is present in a child theme folder?
That’s not entirely true.
The only exception to that rule is the functions.php file, where WordPress will execute the functions.php file in both your child theme folder and parent theme folder.
That means if you have a function in your child theme’s functions.php file that replaces a function in the parent theme’s functions.php file, your site will break.
