
WordPress Speed Guide (2021) – How to Speed Up WordPress

The time it takes to load your website or a webpage is more important than ever. Readers and customers expect high quality images, content, and functionality on your website while the tolerance for long load times is ever decreasing. As a result, page speed has come into great focus in the past several years and with the endless number of tools and discussions about site speed, it’s difficult to focus in on how to make your WordPress website faster.
In this complete guide, we’ll go over:
- The philosophy behind website speed.
- The factors that affect speed.
- What you can do to speed up your WordPress website.
Table of Contents
- Why is Website Speed Important?
- So How Fast Should Your Website Load?
- How to Test Your Website Speed
- Improving WordPress Website Speed
- Time to First Byte
- Properly Size Images
- Image Formats
- Scripting, Media, and Page Weight
- Taking Site Speed to the Next Level
Why is Website Speed Important?
What Google Wants
At the Inside Search event back in 2011, Google gave a clear picture of how they envision a user’s search experience.
People search on Google for answers. And when a search is performed, Google’s goal is to deliver an answer as quickly as possible:
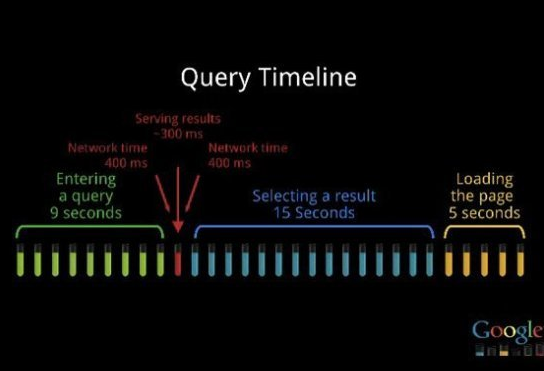
Google’s goal is to reduce every portion of the user’s query timeline (above). It’s the reason why Google has made investments in various features such as:
- Search autocomplete
- Results snippets
- Display content from webpages on search results
- Related search terms (“People also ask”)
- and more…
This is the thought behind the theory that Google will favor sites with faster load times originated.
What People Want
Let’s shift gears to another story that’s widely circulated throughout the Internet. It’s the study that says that for every second in additional load time on Amazon.com, the company loses out on $X worth of sales. You can find various accounts of these stores through a quick Google search but on a side note, I can’t seem to find a link to the actual study.
Now the reason why this is thought to happen is that various individuals have different tolerances for long load times. Some find that the website isn’t loading fast enough, get frustrated, and leave without purchasing anything if the site doesn’t load within 3 seconds; others within 7 seconds.
The Effect of What Google and People Want
These two stories have played a big part in shaping people’s perception of website speed today. And as a result, many try to get their website to load as fast as possible. After all, doesn’t it make sense to get your website to load as fast as possible so that Google will “favor” your website over others that deliver content slower and no one will leave your site without converting?
Makes sense right?
So what if your website loads in 3 seconds? Well, it’s still too slow because it can be 3 seconds faster, right?
What if your website loads in 1 second? Is that fast enough? Many would say “yes.”
We’ll go over some of the problems with this thought and why it leads people to waste a lot of time and resources chasing the “under 1 second” load time, why it’s generally not worth it, and what is actually worth improving.
So How Fast Should Your Website Load?
Let’s recap and address each of the two main motivations for site speed previously mentioned. Most people attribute page speed to SEO and an increase in sales.
Site Speed vs. SEO
They’ll tell you that the faster your page loads, the better your ranking. The problem with this is that there is no evidence that improving page speed improves search results.
Give it a try yourself if your website loads in the 5-10 second range. Use the rest of this guide to increase your site speed as much as possible and monitor the results on Google Search Console. You won’t see a difference in your search rankings over time.
On the other hand, a combination of common sense and the folks at Google tell us that the only time you’ll see page speed have a noticeable impact on your rankings is when your website is painfully slow (~20+ seconds) to load or sometimes doesn’t load at all – a common problem when you begin scaling your website on budget hosts.
Site Speed vs. Sales
You’ll find that the theory behind site speed and sales stems from a study attributed to Amazon (see above). And it makes you think that because your website doesn’t load as fast as Amazon’s, you’re missing out on a tons of sales! After all, the slower your website is, the more users will “drop off” right? Makes sense.
But let’s put this into perspective.
If your website takes 20 seconds for a page to load, then it’s expected that many users won’t stick around for it to finish loading. You hardly need data to prove this. Most people don’t expect to see webpages take that long to load. In this case, I would argue that you should work on making your site faster.
But what if your website is already quite fast? What if you site loads in 6 seconds? Will it an issue for some visitors that it doesn’t load in 3 seconds, which is twice as fast? Some may have a very low tolerance for load times and leave after 4 seconds.
This could be happening with your site, but you probably don’t have the traffic levels that Amazon has, nor do you have the level of sales that Amazon has. So how much in sales are you actually losing because your website loads in 3 seconds rather than 6 seconds?
This thought brings us to another question: Is it actually worth it to make a 3 second improvement in site speed?
Let’s assume that every incremental improvement in site speed results in an equally incremental increase in sales.
There will still come a point where it just won’t make sense for you to make your website faster from a commercial perspective.
It takes A LOT of technical expertise and money to make a resource-intensive webpage to load in the blink of an eye. Is it worth it? It’s an easy question to answer if you’re Amazon, but for most of us, the answer is “no.”
Stay Under 8 Seconds
The reality is that as long as your website loads in a “reasonable” about of time (less than 8 seconds), you’ll be fine in terms of SEO and user experience. And most websites built on WordPress, as long as it’s not overly bloated with plugins will load within this timeframe.
If you find yourself a little bit above the comfort level of 8 seconds, you can make some easy optimizations that don’t take much time.
Throughout this guide, you’ll find an ordered list of the most effective optimizations if you really want to speed up your WordPress site. Some fixes are easy and others are technical while some just require a little bit of time and others require a lot of money. Remember: Think practically before committing to heavy technical work to optimize your site.
How to Test Your Website Speed
There are three major ways to test your website speed today. Each method uses different types of data to provide you with feedback on how you’re doing against your peers and what you can do to improve your website’s load time.
1. Pingdom, GTMetrix, and WebPageTest
These are the most common names in speed tests and you might already be familiar with them. This method downloads your website and gives you recommendations based on what it analyzes. It’s the most basic method of testing website speed and each test is unique in the tools and features that are used to perform the actual test. Thus, you shouldn’t rely on only one test, as you’ll get different results across different tests. Below is a list of factors you should keep in mind as you use several of these tools to test your site speed.
Additionally, you should always get a deep understanding of any speed-related issue/warning before you make any changes to your site.
Some things to keep in mind as you use these tools:
Time to Stop: Onload Time vs. Fully Loaded Time
Onload Time is a measurement of your site speed from the moment it starts loading to when the page finishes loading. However, after the page finishes loading, there may be client-side scripting (JavaScript from your image carousels as an example) that may make additional calls to third-party systems. Thus, the Onload Time may not always be 100% accurate.
Fully Loaded Time is a measurement of your site speed from the moment it starts loading to 2 seconds after the last network activity. This ensures that all resources have finished loading on the page, making the load time better representative of your site’s actual load time as your users see it. You’ll also find that tests that use the Fully Loaded Time return more consistent load times over multiple tests.
Pingdom – Onload Time
GTMetrix – Fully Loaded Time by default but Onload Time is an option
WebPageTest – Fully Loaded Time by default but Onload Time is an option
Test Locations
When you use any of the tools above, your website is downloaded by a server in a physical location somewhere in the world. Each tool will feature a variety of test locations that are different from other tests. It’s very important to test from a location where you expect many of your users to be. For example, if you have a website for a local pet adoption agency in New Hampshire, you most likely won’t get any meaningful traffic from Central Africa. There’s no use testing from the latter location.
However, if you have a target audience that encompasses a wide geographic area, consider using a CDN.
Flaws
Though Pingdom, GTMetrix, and WebPageTest are the most popular, they have some flaws. Remember, the goal is to get your site to load fast enough so that search engines like Google don’t penalize you and you decrease the likelihood that your users will leave your site before the page loads. Thus, you want a test that is truly reflective of these two goals
However, GTMetrix directly tells you to things which slows your site down such as sharding, whereas Pingdom has a focus on how fast your server sends the data. But it’s much more important to test how fast that data turns into a page on the users device (FCP aka First Contentful Paint).
2. Chrome User Experience
Instead of simply a “simulation” by a computer, Google’s Chrome User Experience uses actual telemetry data from actual Google Chrome users. Google Chrome reports back to Google how fast your website/webpage has loaded for them. And in turn, Google gives this information to you, giving you a better idea of how quickly your site is actually loading for users.
The two key measurements displayed are FCP (how long it takes before your content starts showing up on the screen) and DCL (how long before the website is fully loaded).
Those that are more technical can learn more about Google’s Chrome User Experience here. Most, however, will be familiar with the most common tool to see Chrome User Experience data: PageSpeed Insights.
Flaws
Chrome User Experience and PageSpeed Insights tells you how fast your site has actually loaded for Google users. However, it doesn’t give you enough information on what you can do to make your site faster or where your areas of improvement are.
3. Lighthouse
Today, the absolute best way to test website speed is to use the Lighthouse test. The two types of speed tests previously mentioned (above) work but they have some glaring flaws.
Note: As of November 12, 2018, PageSpeed Insights is now powered by Lighthouse. However, using Lighthouse is still recommended. Keep reading below for the reason why.
Lighthouse runs a lot more modern tests on your website and gives you better recommendations for site optimization than the old PageSpeed Insights did. It runs completely on your own computer, as it’s a chrome extension, but it strives to give a much better real world picture of how your website would load for end users. You can download the Lighthouse Chrome extension here.
Improving WordPress Website Speed
If you’ve made it this far, you should now have a solid understanding of why page speed really matters and what you should do about it. But what are the key components of website speed that you should address and how can you address them?
Below are individualized sections where we point out the most common issues that slow down WordPress websites and what you can do to fix them.
Time to First Byte
If you ran any of the speed tests previously mentioned in this article such as Pingdom, you might have taken notice of a waterfall chart which looks like this:
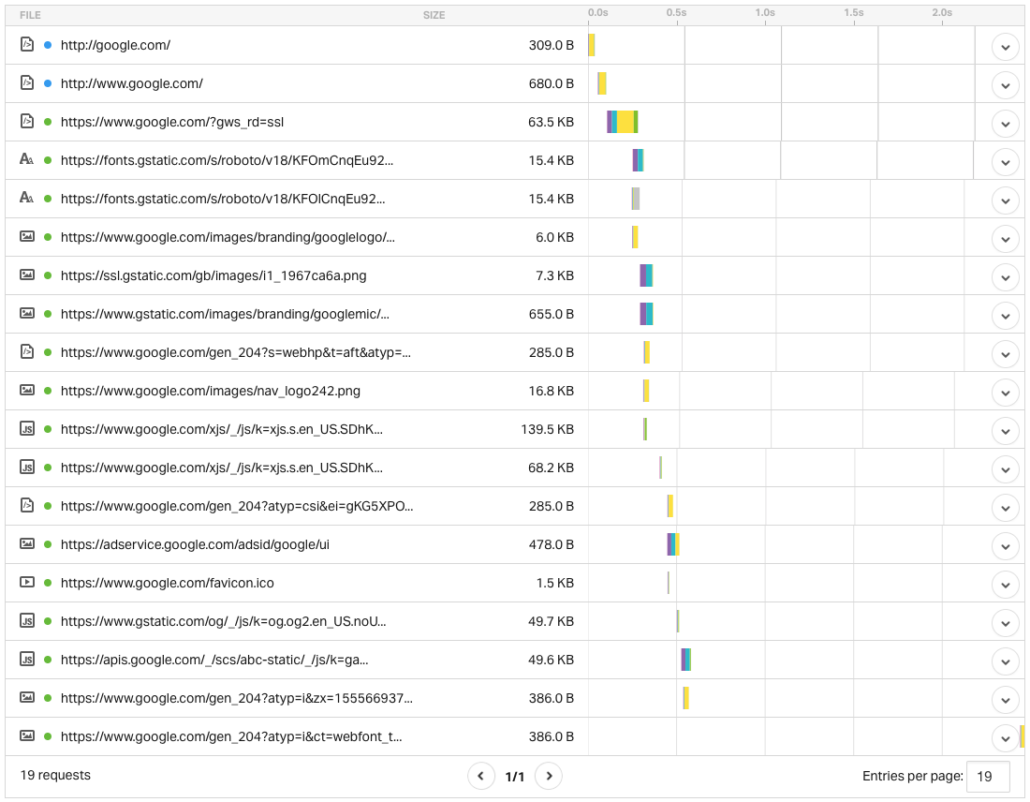
It provides a visualization of how long it takes for each asset to load on your page, which culminates into the total load time for your entire page.
Now if you take a look at the first row or the first bar, it might be labeled X, which means that this is the time it took for your server to initially send a response. It’s more commonly called “Time to First Byte” or abbreviated as TTFB. If you’re hosting with a budget provider or you’re on a shared hosting plan, you might see that this bar is quite large in relation to the others below it.
If that’s the case, there are two reasons why this might be happening:
- Your hosting server doesn’t have enough resources or computing power to respond as quickly as you’d like.
- The distance between the location of your hosting server and the user is long.
In the case of #1, the only solution is to move to a dedicated server or a VPS that provides sufficient dedicated resources for your website to respond quickly. In almost every case, that’s going to increase your costs significantly. Now if you have the know-how to spin up your own VPS and install and manage a WordPress site, you can migrate to a provider such as Digital Ocean or Vultr for as low as $5 per month. By doing so, you’ll see significant improvements in your TTFB and your overall website speed.
Here’s a list of our favorite VPS providers and their lowest pricing tiers:
Digital Ocean – $5 per month
Vultr – $2.50 per month
AWS Lightsail – $5 per month
Linode – $5 per month
But for those that can’t afford to switch from a budget host that allows you to host your website for a couple of dollars per month, you can mitigate the slowness by addressing point #2 above: Decrease the distance between the location of your hosting server and the user.
Your server is in a single location and your users may span the globe. So you’ll have to maintain multiple servers to cover your audience, by using a “Content Delivery Network” or a CDN. This sounds expensive but it’s not. You can read more about how CDN’s work in a separate article here.
And if you’re on a tight budget (or have no budget at all), you can sign for Cloudflare’s free plan to take advantage of their fast CDN network.
Properly Size Images
Image resolutions should closely resemble the actual size that will be rendered on your page(s). For example, if you upload an image that’s intended to be used as an icon where the maximum size is 80 pixels by 80 pixels, then there should be no need to upload the image to your Media Library with size greater than 80 pixels by 80 pixels.
Generally speaking, higher resolution images will result in sharper images. And we all want the best image quality on our sites. But there’s a direct tradeoff between image quality and load time. And if the maximum dimensions of the image that will be displayed on your page is 80 pixels by 80 pixels, there will be no noticeable benefit for your users if you choose to use an image that’s 100 pixels by 100 pixels (or greater).
Background images are a bit more tricky because they take up so much real estate on your screen. And with monitor sizes becoming much larger every year, it’s tempting to use the highest resolution image you possibly can create or find. But again, there’s a direct trade off here. The rule of thumb for background images is to make sure the width doesn’t exceed 1600 pixels.
You also don’t need special tools or software to resize your images properly. If you upload high resolution images to your Media Library, you can choose to edit the image and specify a new height or width for your image, and your Media Library will automatically retain the aspect ratio and resize your images.
Image Formats
Let’s say you’ve properly sized all of your images. What more can you do?
Images are generally very rich in formatting when they’re first taken or created. Unfortunately, much of this data is useless when using these images for websites and they just add to the weight of your image files without having any effect on quality.
In order to remove all unnecessary formatting data from your images, use an optimization tool like Kraken.io or Smush. Both plugins, after setup, will automatically optimize all images that you upload to your Media Library.
Here’s a list of our favorite plugins that will cure all of your image formatting issues:
Smush – The free version of their plugin can be found in the WordPress repository. All you have to do is install the plugin and once in a while, click the “Smush” button in the plugin settings page to optimize all of your images. One downside with the free version of the plugin is that it won’t optimize images that are very large. If you run into this issue, make sure you downsize the image to it’s appropriate size first.
Download Smush from the WordPress repository.
Kraken.io – One of the lesser known plugins. You’ll have to sign up for a free account on Kraken.io and then install the WordPress plugin to connect your site to the service. It won’t restrict you to the type or sizes of images you can optimize, and it runs automatically. However, their free tier will only optimize a certain amount of data at any given month. This will only be an issue or limitation if you upload a large number of images on a monthly basis. For most sites, it won’t be an issue.
Scripting, Media, and Page Weight
Webpages today heavily rely on scripts and videos to create a rich user experience. Again, there is a tradeoff here. Scripts and videos take a very long time to load and there isn’t much you can do to make them load faster.
Before thinking about adding everything you can to a particular webpage, ask yourself what’s needed at a bare minimum to fulfill the page’s objective and refrain from using heavy videos or scripts.
Now scripts can be optimized a bit to mitigate the effects they have on your site speed. If you’re using Cloudflare, scripts should already be minified. But if you aren’t using anything that minifies your JavaScript, you can download plugins such as Autoptimize or W3 Total Cache. Once configured properly, you’ll see noticeable savings in speed.
Taking Site Speed to the Next Level
If you’re wondering how you can further increase the speed of your site after performing the changes above, feel free to reach out to our development team to help you address your site speed issues.


